
Lorex Camera Installation Step-by-Step Explained!
Indeed, Lorex cameras are the perfect blend of advanced technology and robust security. If you own this security gadget and want to harness its full capabilities, then you must understand the importance of a well-planned Lorex Camera Installation. Therefore, this deep dive empowers you to unveil the proper placement of the Lorex security camera. Additionally, you will learn the technical nuances, ensuring long-term reliability and the camera’s optimal performance. Let’s get the Lorex camera mounted right away!
Initiating the Lorex Camera Installation
Generally, the Lorex security cameras have all that is needed to get your surveillance device running correctly. When you buy a brand new camera, it comes with certain components, which are essential to mount, place, and connect your security camera. So, let’s have a look at what is included in the box:
- The camera itself
- Ethernet cable
- Power adapter
- Mounting template
- Anchors and screws
- Mounting bracket, etc.
How To Install Lorex Cameras Easily: Step-by-Step Procedure!
To begin, as you have just unboxed your security camera and collected the included components. Now, it is important to ensure a stable 2.4 GHz wifi network before the Lorex Camera Installation. This will not help in completing this process seamlessly, but it also helps in establishing a reliable connection. Further, find an optimal location for installing your security camera. Now, let’s dive deep into this step-by-step installation process:
- Initially, look around and consider the key area to adjust the camera’s field of view.
- Now, check and clear all the obstructions, such as walls, trees, etc.
- Additionally, ensure an optimal mounting height for your security camera.
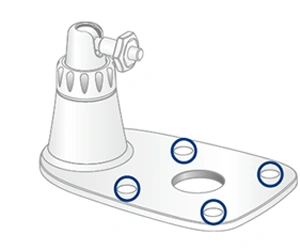
- After that, use the provided mounting template to mark & drill the holes.
- Insert the anchors if you are mounting the camera on drywall or any other soft surface.
- Now, attach the mounting bracket using the included screws using the Phillip-headed screw driver.
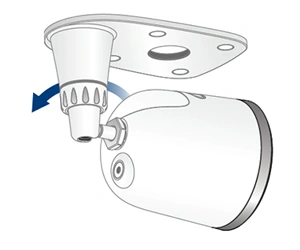
- While mounting, ensure that the PUSH/FRONT tabs are facing upwards.
- If your camera runs along the wall, use the round cable notch on the camera cover.
- Move your camera to set the preferred angle and cover field of view.
- After that, attach the square notch on the camera cover and slide the camera downwards.
- When you hear a click, tighten the lock screws using a screwdriver.
- Next, peel off the protective film from your camera lens.
- Follow the on-screen instructions to complete the further process.
- Finally, you have learned How To Install Lorex Cameras.
Pro Tip: In the aforementioned process, a Dome camera is taken into consideration. The steps may vary depending on your camera type or model.
In the End
Overall, this guide briefly explained the Lorex Camera Installation in simple steps. However, this camera installation requires the strategic planning and placement of your camera. By following this quick guide, you can easily install and make the most of your security device. If you want to configure the advanced security settings on your camera, opt for the Lorex Home app.